EVOLUTION - leaving traces everywhere, and fly-tying is no exception. A continuously expanding amount of tools and materials is
making the product catalogues thicker and thicker. One of the things that has growed quite popular is the 'true rotary vise', or the 'inline
rotation vise'. A little more complicated looking than the type of vise one might be used to, but it's still just a vise. While it can
simplify some steps and improve the final result, it will not tie the fly for you... at least not all of it.
Many (if not
most) conventional vises also have jaws which can be rotated. The big difference between the conventional vise and the true rotary vise,
is the way of which the jaws rotate. The jaws on a conventional vise rotate around their own center line, while the jaws on a true rotary
vise instead are rotated by an extension that has its own, horizontal, axis of rotation.
The shape and angle of the jaws will differ widely between the models, but the thing they have in common is that they will hold a hook
with the hook shank inline with this horizontal axis of rotation (most having height adjustment to fit the hook size).
The result: While a 180 degrees turn of the jaws on a conventional vise can position the hook with the shank in a more or
less vertical angle, the turn on the true rotary vise will roll the hook over on its back... and nothing more. Angle of hook shank
and its distance to the table - unchanged.
  |
|
To the left a conventional vise - to the right, a true rotary vise. Axis of rotation in red and a semi-transparent result of a 180 degrees turn.
|
The advantages offered by this construction are numerous...
- Since the fly rolls freely around its own center line, the annoying factor 'other side' is eliminated. It doesn't matter on which
side you're tying in your material. Everything will be in front of you and legs on the far side are tied in just as comfortable as
the legs on the near side. A step up in control and ergonomy.
- Applying head cement, epoxy, paint etc. will also get easier. As all sides of the fly will be the 'right' side, you will see what you're
doing at all times and can also easier avoid doing it where you don't want it done. If the fly needs rotating while
glue is setting, the vise can of course be a helpful tool for that too.
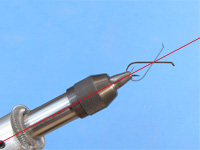
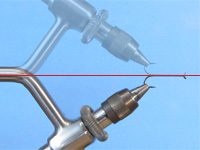
- Wrapping material the "normal" way, will mean one of two things: The twist of the material will increase with each wrap... or you will have
to transfer the material to the other hand after each wrap, with a higher risk of uneven wraps or dropping the material. Using a true rotary
vise, you can instead rotate the hook and let the vise do the wrapping for you... "tying your fly" if you want. Not only is it a plus to be
able to see it being applied all around the fly while doing it. It will also save a lot of time while doing the really "nasty" wrapping
jobs... like wire, floss or tinsel bodies etc.
 |
|
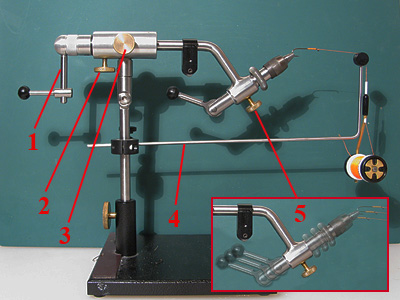
A few examples on parts/functions which are more or less standard on a true rotary
vise. They can differ in both designs and locations, but they usually will be "around there somewhere".
|
1: Rotation handle. For comfortably rotating the fly. A handle in some form is to be found on most rotary vises, however
not on all (for example the upper left vise on the top photo). Personally I think the vise SHOULD have a handle 'in some form', straight or
angled, to bring out most of its advantages. It really adds speed and comfortability. To me, only a knurled knob back there, is
wasting half of it: Rotatable for comfortable tying... but not for comfortable rotary tying.
2: Rotation lock. Locks the extension part completely and in a 12 o'clock position... in other words - makes it into a "non-rotary" vise.
3: Friction screw. Adjusts the rotary friction. Can be a free lying screw like this or in the form of an additional knob or ring
at the left of the bearing housing (like on the upper left vise in the top photo).
4: Bobbin cradle. For hanging up the bobbin when applying material using the rotary function. Hanging with the thread in line
with the hook shank, like on the photo, no additional thread wraps will be applied when rotating. (It's also a useful accessory just for
the purpose of getting more clearance below the the hook.)
5: Lock screw for movable jaws. Holds the jaws in position after they have been adjusted to a height where the hook shank
is inline with the axis of rotation.
True rotary vises can be found with a wide range of price tags... from $40-50 up to $1000+. So to try one out doesn't have to cost
you a fortune. If you can afford a late night out with a few beers, you can afford to try out one of the cheaper models. You don't need to dig
deep in your wallet to get one that's more than able to show you what it's about.
"You won't miss what you never knew... but without finding out, you won't know what passed you by either." If your buy
tells you that true rotary applies to you, it won't have been wasted money. If it doesn't, all you will have lost is a late night out
with a few beers... which I'm sure won't affect your plans for next weekend anyway, right? ;o)
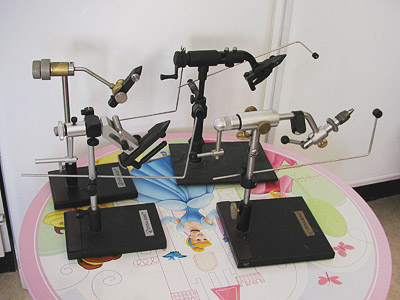
Vises on the top photo:
Top left: Eagle Rotating Vise - Indian made... the $50 vise that put me "inline with evolution".
Top right: Danica Innovation Cam Vise a.k.a. Danvise - Danish delrin vise. Price around $80.
Bottom left: Griffin Montana Mongoose - US made vise. Price around $200.
Bottom right: Dyna-King Barracuda DeLuxe - US made vise. Price around $360.
|
|